I’m now getting IMS every 2 weeks instead of weekly. I can’t tell if IMS is supposed to treat/heal fibromyalgia directly, but it does work on big pains that probably contribute to the condition of fibromyalgia syndrome (FMS). For example, “Saturday Headaches” are virtually gone and I can walk without knee braces much more than in the past few years. I can play oboe until my mouth stops without excess pain in the arms. I haven’t systematically verified if regularity of notes has improved or not, but not having noticed any problems is a good sign.
Stretching still seems best for the general FMS conditions of constant tension (especially in the legs) causing fatigue. My sleep really improves when I stretch at night. I still get headaches, but it seems due to the season (tree pollen) and bad habits at the computer workstation. Slouching forward and back is really hard to quit.
My therapist started working on slender muscles that cause the worst pains when practicing or working around the house. These are long slender muscles in the forearm and shoulder, apparently under other muscles. The first treatment on these muscles caused a huge grasping reaction: the needle was therefore considerably painful. The reaction (including hot and cold sweats and my whole body shaking) lasted for several minutes after the needle was removed and the soreness in the arm was so bad, I had to leave work early because I couldn't concentrate. The next day, everything was fine and those muscles were fully relaxed... that is, even more than "normal"; in other words, a very welcome relief! Over the week, the arm remained rather well. When strain returns, it returns much less than before. The second treatment on those muscles was MUCH easier: no huge reaction and only moderate soreness for the rest of the day.
Treatment on the lower back is funny: relief is felt immediately and lasts for the remainder of the day. The next day, I get twinges again, but the 2nd day after, the back is much more relaxed and remains so for about a week.
Binding (Tying) Oboe Reeds
 I’ve seen clarinet and saxophone players buy not only a dozen different mouthpieces, but also a dozen different ligatures to get their reeds to play the way they like. Now consider that once you’ve tied the reed and started scraping, that’s it: no going back! I really consider the choice of shapes, staples and the binding more important than most characteristics of the cane itself.
A Google search should give you a good number of video demonstrations, textual explanation with images (click the pictures for their source), books and DVDs that are worth buying. So I will just add my observations on what is important. Tying reeds is a simple concept, but it requires a whole lot of care and attention. The following factors must be considered:
- length of cane on the staple to ensure proper seal without constraining the vibration,
- proper alignment of the cane (with or) without sideways slippage,
- winding the thread so it won’t pass the end of the staple.
 There are many schools of practice, most notably Philadelphia (American) scrape and various European scrapes. Number 3 is the only thing that all schools agree on (to my knowledge): the thread must stop one or two twists before the end of the staple. Winding thread must never go past the staple. To this day, I still find reeds that refuse to vibrate well have been tied 1/2 to 1 wind of thread past the end of the staple.
Concerning the length at which the reed is tied, many oboists from every school of practice tie at a specified length, regardless of the shaper and/or staple they use whereas others tie at specific lengths that vary with the choice of staple and/or shaper. My own experience considers that the important issue is where the cane closes with respect to the end of the staple. 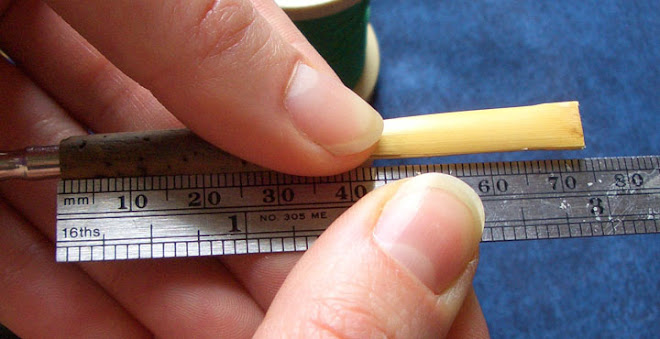 I have found that what my main teacher (Bernard Jean) taught me remains the best way to ensure free vibration of the reed for fuller dynamics and ease of responsiveness: the blades should close one or two twists of the thread before the end of the staple. Because different characteristics in the cane and variations in staple dimensions (even within the same model from the same manufacturer) means that the cane will not always close at the same length: so binding includes pushing up or pulling down the cane before finishing the thread winding.
Le Guide Roseau (Cane Guide) and Pre-Binding for proper blade alignment
For number 2, the proper alignment of cane blades, there are again disagreements. Many who follow variations on the Philadelphia scrape like to offset the overlap of the blades whereas pretty much all who use European techniques expend considerable efforts in eliminating any offset at all. My observations suggest that some offset might be good for some people who have less lung strength and I have been surprised with excellent reeds that had slippage. But in principle and for my own use, I fully agree with the European idea of perfect overlap (no offset at all). This is a very difficult thing to accomplish because the winding thread produces torque that naturally wants to twist the cane with it. Luckily, there are 2 ways to virtually ensure complete absence of offsetting.
The video above is made from still images and shows what I call pre-binding. This consists of using some delicate thread (like the cheap stuff that comes with sewing kits in corner-stores) to wrap the top part of the cane before binding. This prevents slippage due to torque during binding and holds the cane reasonably well on the staple which relieves some of the difficulty of finger-holding during the bind. Delicate thread ensures the cane does not get damaged and it is easily removed when the binding is finished.
Pre-binding is not perfect and if done improperly will allow slippage. Le Guide Roseau (the Cane Guide) is an invention by Fabrice Rousson which eliminates the failings of pre-binding. He provides his own video demonstration (French only, but visually self-explanatory) and the slide-show to the right gives the highlights. Although it might not look like much, after having tried it, it really does do wonders. I tied over a dozen reeds with it and it is superb: by far easier and more dependable than pre-binding. I will scrape some of these reeds next week (that will be the real test) but looking closely at the side of the blades near the thread is the most promising I have ever seen.
Mr. Rousson makes one for oboe and one for English Horn. The one for oboe does not fit the widest shapes so well (RDG #2, Roseau Chantant RC3, Kunibert Michel 7.5 – they tend to split), but these shapes are really for oboe d'amore anyway. For those shapes, pre-binding remains a very useful option, but for real oboe shapes (RDG -1, Kunibert Michel 7.25, Weber wide), the brass cane guide works fantastically.
You can get instructions and more pictures on tying with the Cane Guide here.
Vous pouvez obtenir des instructions avec plus d’images sur le ligatturage avec le guide roseau ici.
No comments:
Post a Comment